Menu

Saturday 11 July 2020

Disable/Remove Server: Apache header info version (Apache2.4)


File Name : httpd-ssl.conf  OR ssl.conf
*************************************************************
LoadModule headers_module modules/mod_headers.so

Header unset Server
Header unset Etag

ServerTokens Prod
ServerSignature off

SecServerSignature " "


*************************************************************


OR 


Enable: modules for mod_security.

  • LoadModule security2_module modules/mod_security2.so
  • <IfModule !mod_unique_id.c>  LoadModule unique_id_module modules/mod_unique_id.so  </IfModule>

File Name : mod_security.conf
*************************************************************

<IfModule mod_security2.c>

    # Default recommended configuration
        SecRuleEngine On
SecServerSignature "123456 "
        SecRequestBodyAccess On
        ...
        ... ...
        ... ... ...

<IfModule mod_security2.c>

*************************************************************


Thanks 😊

Restrict application Accessible by IP Address & HTTP Host Header Injection (Apache 2.4)


  • To mitigate host header poisoning/attack kindly make sure.
  • Use the hostname instead of IP address in the header.
  • Can refuse a request if it doesn't have the desired or expected host header. 
  • For this, Add initial RewriteCond/RewriteRule pair to confirm the HOST requested is ABCDEF.com and error if not.
  • To restrict add below lines between <VirtualHost :443> OR  <VirtualHost :80>  


File Name : httpd-ssl.conf  OR ssl.conf
*************************************************************

LoadModule rewrite_module modules/mod_rewrite.so

<VirtualHost *:443>

  ServerName ABCDEF.com
  ServerAlias www.ABCDEF.com
  
  ### UseCanonicalName On Apache httpd will use the hostname and port specified in the ServerName or ServerAlias
  UseCanonicalName On 
  
  ## Restrict the Use of IP adderss in URL
  SetEnvIf Host "\d{1,3}\.\d{1,3}\.\d{1,3}\.\d{1,3}" HostHeaderIsIP=1
  RewriteEngine on
  RewriteCond %{ENV:HostHeaderIsIP} 1
  RewriteRule .* - [F]
  

  ## HTTP Host Header Injection
  RewriteEngine On
  RewriteCond %{HTTP_HOST} !^www.abcdef.com [NC]
  RewriteCond %{HTTP_HOST} !^(www.abcdef.com|abcdef.com)$ [NC]
  RewriteRule .* - [F]

  </VirtualHost>
  
****************************************************************


To check,  use below curl command as per your application URI:-
  • curl -H "Host: www.example.com" http://localhost/
  • curl -i -s -k -X $'GET' -H $'Host: wwww.example.com' $'https://www.abcdef.com/app/web/acess'

Thanks 😊


HTTP Host Header Injection (Apache and IBM HTTP SERVER- IHS)


  • To mitigate host header poisoning/attack kindly make sure.
  • Use the hostname instead of IP address in the header.
  • Can refuse a request if it doesn't have the desired or expected host header. 
  • For this, Add initial RewriteCond/RewriteRule pair to confirm the HOST requested is ABCDEF.com and error if not.
  • To restrict add below lines between <VirtualHost :443> OR  <VirtualHost :80>  


File Name : httpd-ssl.conf  OR ssl.conf
*************************************************************

LoadModule rewrite_module modules/mod_rewrite.so

<VirtualHost :443>

    ServerName ABCDEF
    RewriteEngine on
    RewriteCond %{HTTP_HOST} !^www.abcdef.com [NC]
    RewriteCond %{HTTP_HOST} !^(www.abcdef.com|abcdef.com)$ [NC]
    RewriteCond %{REQUEST_URI} !^/error [NC]
    RewriteRule ^.(.*) - [L,F]
</VirtualHost>

*************************************************************


 ## Restrict the Use of IP address  in URL to access application.

File Name : httpd-ssl.conf  OR ssl.conf
*************************************************************
<VirtualHost :443>

 ServerName ABCDEF.com
  ServerAlias www.ABCDEF.com

 #UseCanonicalName will use the hostname and port specified in the ServerName or ServerAlias

 UseCanonicalName On   


  # Restrict the Use of IP adderss in URL
  SetEnvIf Host "\d{1,3}\.\d{1,3}\.\d{1,3}\.\d{1,3}" HostHeaderIsIP=1
  RewriteEngine on
  RewriteCond %{ENV:HostHeaderIsIP} 1
  RewriteRule .* - [F]


</VirtualHost>

*************************************************************

Thanks 😊

Local File Inclusion Vulnerabilities OR Directory traversal attack


  • The attacker can easily download system files with the help of directory traversal vulnerability.
  • Address: https://www.example.com/example/download.jsp?fileName=../../../../etc/passwd
  • Clicking on this link it will download /etc/passwd file 
  • To restrict download add below lines <VirtualHost :443> OR  <VirtualHost :80>   .


File Name : httpd.conf & ssl.conf

*************************************************************
LoadModule rewrite_module modules/mod_rewrite.so

RewriteEngine on
RewriteCond %{THE_REQUEST} ^.*/\.
RewriteRule ^(.*)$ - [R=404]

*************************************************************


Thanks 😊

Information disclosure through server response headers Apache-Coyote & X-Powered-By (JBoss).


Vulnerable Response from the Jboss application server headers.
  • Server: Apache-Coyote/1.1
  • X-Powered-By: JSP/2.2

Change 1: for (Server: Apache-Coyote/1.1)

File Name: standalone.xml
*************************************************************

<system-properties>
        <property name="org.apache.coyote.http11.Http11Protocol.SERVER" value="DONTKNOW"/>
        <property name="org.jboss.as.sendServerHeader" value="false"/>
</system-properties>

*************************************************************


Change 2: for (X-Powered-By: JSP/2.2)

File Name: standalone.xml
*************************************************************

<subsystem xmlns="urn:jboss:domain:web:1.5" default-virtual-server="default-host" native="false">
            <configuration>
                <jsp-configuration x-powered-by="false" display-source-fragment="false"/>
            </configuration>
            <connector name="http" protocol="HTTP/1.1" scheme="http" socket-binding="http"/>
            <connector name="ajp" protocol="AJP/1.3" scheme="http" socket-binding="ajp"/>
            <virtual-server name="default-host" enable-welcome-root="false">
                <alias name="localhost"/>
<subsystem/>

*************************************************************


Thanks 😊

Friday 10 July 2020

Tomcat ghostcat vulnerability (JBoss /Tomcat)

  • Ghostcat is a vulnerability found in Apache Tomcat versions 6.x, 7.x, 8.x, and 9.x that allows remote code execution
  • Apache Tomcat includes the AJP connector, which is enabled by default and listens on all addresses on port 8009.
  • which allows the attacker to get information from the application, including the `WEB-INF` and `META-INF` deployment folders.

Option1:
 if you are using AJP port on (Tomcat ) then update tomcat version to 

*************************************************************

Apache Tomcat has officially released versions 9.0.31, 8.5.51, and 7.0.100 to fix this vulnerability

*************************************************************


Option2
if you are not using AJP port on (Tomcat /JBoss) then disable/comment the same AJP port on server.xml /standalone.xml file.

*************************************************************

<connector name="ajp" protocol="AJP/1.3" scheme="http" socket-binding="ajp" enabled="false"/>

*************************************************************


Thanks 😊

SSL certificate supports Weak Ciphers/Encoding (3DES) (Apache 2.4)

  • SSL Medium Strength Cipher Suites Supported (SWEET32) [TOMCAT server]
  • The remote host uses weak cipher encryption for communication.
  • Where SWEET32 is also called 3DES / Birthday attack.

To verify use below OpenSSL command:
If the OpenSSL is connected to the host at SSL port & we received the response with the certificate then it's having weak cipher suites.
  • openssl s_client -connect Hostname:443 -cipher ""DES:3DES"" -tls1_2
  • openssl s_client -connect Hostname:443 -cipher ""DES:3DES"" -tls1_1
  • openssl s_client -connect Hostname:443 -cipher ""DES:3DES"" -tls1


SSLCipherSuite having strong cipher enabled, and to disable/restrict weak cipher using !DES:!RC4:!3DES:!MD5:!PSK


File Name: ssl.conf / httpd-ssl.conf
**************************************************

SSLCipherSuite ECDHE-RSA-AES128-GCM-SHA256:ECDHE-ECDSA-AES128-GCM-SHA256:ECDHE-RSA-AES256-GCM-SHA384:ECDHE-ECDSA-AES256-GCM-SHA384:DHE-RSA-AES128-GCM-SHA256:DHE-DSS-AES128-GCM-SHA256:kEDH+AESGCM:ECDHE-RSA-AES128-SHA256:ECDHE-ECDSA-AES128-SHA256:ECDHE-RSA-AES128-SHA:ECDHE-ECDSA-AES128-SHA:ECDHE-RSA-AES256-SHA384:ECDHE-ECDSA-AES256-SHA384:ECDHE-RSA-AES256-SHA:ECDHE-ECDSA-AES256-SHA:DHE-RSA-AES128-SHA256:DHE-RSA-AES128-SHA:DHE-DSS-AES128-SHA256:DHE-RSA-AES256-SHA256:DHE-DSS-AES256-SHA:DHE-RSA-AES256-SHA:!aNULL:!eNULL:!EXPORT:!DES:!RC4:!3DES:!MD5:!PSK

**************************************************


Thanks 😊

SSL Medium Strength Cipher Suites Supported (SWEET32) [Tomcat Server]

  • The remote host uses weak cipher encryption for communication.
  • Where SWEET32 is also called 3DES / Birthday attack.


To verify use below command: If the OpenSSL is connected to the host at SSL port & we received the response with the certificate then it's having weak cipher suites.

  • openssl s_client -connect Hostname:443 -cipher ""DES:3DES"" -tls1_2
  • openssl s_client -connect Hostname:443 -cipher ""DES:3DES"" -tls1_1
  • openssl s_client -connect Hostname:443 -cipher ""DES:3DES"" -tls1

  • We need to remove below high-lighted mark for weak ciphers & check the application for the same VA point on the instance.


File Name: $TOMCAT_HOME/conf/server.xml 
**************************************************

<Connector port="443" protocol="org.apache.coyote.http11.Http11NioProtocol" acceptorThreadCount="2" maxConnections="-1"
               SSLEnabled="true" scheme="https" secure="true"
               clientAuth="want" sslProtocol="TLS" sslEnabledProtocols="TLSv1.2,TLSv1.1,TLSv1" keystoreType="jks" keystoreFile="/app/apache-tomcat-7.0.81/cert/serverkeystore.jks" keystorePass="Password@123" truststoreFile="/app/apache-tomcat-7.0.81/cert/truststore.jks" truststorePass="Password@123" ciphers="TLS_ECDHE_ECDSA_WITH_AES_128_CBC_SHA,TLS_ECDHE_RSA_WITH_AES_128_CBC_SHA,TLS_RSA_WITH_AES_128_CBC_SHA,TLS_ECDH_ECDSA_WITH_AES_128_CBC_SHA,TLS_ECDH_RSA_WITH_AES_128_CBC_SHA,TLS_ECDHE_ECDSA_WITH_3DES_EDE_CBC_SHA,TLS_ECDHE_RSA_WITH_3DES_EDE_CBC_SHA,TLS_ECDH_ECDSA_WITH_3DES_EDE_CBC_SHA,TLS_ECDHE_ECDSA_WITH_AES_128_CBC_SHA256,TLS_ECDHE_RSA_WITH_AES_128_CBC_SHA256,TLS_RSA_WITH_AES_128_CBC_SHA256"/>

**************************************************


Thanks 😊


ETag vulnerability & X-Powered-By : jsp/2.2

  • ETags from Web servers are also considered an information leakage vulnerability on web-server.
  • Apache (httpd.conf & ssl.conf)
  • Enable "LoadModule headers_module modules/mod_headers.so" 

*************************************************************
LoadModule headers_module modules/mod_headers.so

Header unset Server
Header unset Etag
ServerSignature Off
ServerTokens Prod
TraceEnable off

*************************************************************

To test: curl –I  http://ipAddressOrHostName:port


Disable X-Powered-By on (apache-Web / IBM HTTP Server).

  • As the "x-powered-by: jsp/2.2" version is provided by application servers, that can be mitigated on Web-server also.
  • Apache (httpd.conf & ssl.conf)
  • Enable "LoadModule headers_module modules/mod_headers.so" 

*************************************************************
LoadModule headers_module modules/mod_headers.so

Header always unset "X-Powered-By"
Header unset "X-Powered-By"

*************************************************************

To test: curl –I  http://ipAddressOrHostName:port


Thanks 😊


Missing Security Header(x-xss-protection) & Clickjacking

Missing Security Header(x-xss-protection) Missing HTTP Headers
  • missing X-XSS-Protection header which means that this website could be vulnerable to Cross-site Scripting (XSS) attacks.
  • Apache (httpd.conf & ssl.conf)
  • Enable "LoadModule headers_module modules/mod_headers.so" 

***********************************************
LoadModule headers_module modules/mod_headers.so

Header set X-Content-Type-Options "nosniff"
Header set X-XSS-Protection "1; mode=block"

***********************************************

OR

***********************************************
LoadModule headers_module modules/mod_headers.so

<IfModule mod_headers.c>
Header set X-XSS-Protection "1; mode=block"
</IfModule>

***********************************************


To test: 
curl –I  http://ipAddressOrHostName:port


Clickjacking 
  • Clickjacking is also called an iframe window trick, the attacker can get the data while the user clicks on some buttons or links.
  • Apache (httpd.conf & ssl.conf)
  • Enable "LoadModule headers_module modules/mod_headers.so" 

***********************************************
LoadModule headers_module modules/mod_headers.so

Header set X-Frame-Options SAMEORIGIN
Header always set Strict-Transport-Security "max-age=31536000; includeSubDomains; preload"

Apache (httpd.conf & ssl.conf)

***********************************************


To test: curl –I  http://ipAddressOrHostName:port


Thanks 😊

Disable HTTP TRACE / TRACK / OPTIONS/DELETE Method.

  • A local or remote unprivileged user may be able to abuse the HTTP TRACE/TRACK functionality to gain access to sensitive information in HTTP headers when making HTTP requests.
  • For, Apache / IBM HTTP Server: add below parameters bewteen <virtualhost :443> tag  <virtualhost/> for PORT 80 & 443.

****************************************************
LoadModule rewrite_module modules/mod_rewrite.so

TraceEnable Off

RewriteEngine On
RewriteCond %{REQUEST_METHOD} ^TRACE
RewriteRule .$ - [F,L]

RewriteEngine On
RewriteCond %{REQUEST_METHOD} ^TRACK
RewriteRule .$ - [F,L]

RewriteEngine On
RewriteCond %{REQUEST_METHOD} ^PUT
RewriteRule .$ - [F,L]

RewriteEngine On
RewriteCond %{REQUEST_METHOD} ^OPTIONS
RewriteRule .$ - [F,L]

****************************************************

To check use below test cases,:  If you are getting 405 Method Not Allowed, then its work.

  • curl -i -X OPTIONS http://ipAddressOrHostName:port
  • curl -X TRACE localhost

Output:
***********
<!DOCTYPE HTML PUBLIC "-//IETF//DTD HTML 2.0//EN">
<html><head>
<title>405 Method Not Allowed</title>
</head><body>
<h1>Method Not Allowed</h1>
<p>The requested method TRACE is not allowed for the URL /.</p>
</body>
</html>
***********


Thanks 😊

Thursday 5 March 2020

Install Nginx plus on RHEL 7.4+ / CentOS 7.4+ / Oracle Linux 7.4+

What is NGINX Plus?

  • NGINX Plus is a software load balancer, web server, and content cache built on top of open source NGINX. 
  • NGINX Plus has exclusive enterprise‑grade features beyond what's available in the open-source offering, including session persistence, configuration via API, and active health checks. 
  • Use NGINX Plus instead of your hardware load balancer and get the freedom to innovate without being constrained by infrastructure.


Step 1: Open the Nginx Plus URL link: https://cs.nginx.com/repo_setup


Step 2: Choose your OS and distribution (RHEL 7.4+ in my case).


Choose Enterprise version OR you need to choose free trial request for 30 days URL    

 https://www.nginx.com/free-trial-request


step 4: Register and you will receive a trail mail for 30 days, from there need to download nginx-repo.key & nginx-repo.crt files. 


  • Reference mail to download "nginx-repo.crt" & "nginx-repo.key" file


**********************************************************
Since this first installation, you will face "No such file or directory this"

Step 1) If you already have old NGINX packages in your system, back up your configs and logs: 

Command
sudo cp -a /etc/Nginx /etc/nginx-plus-backup

sudo cp -a /var/log/nginx /var/log/nginx-plus-backup


Step 2) Create the /etc/ssl/nginx/ directory:

Command
sudo mkdir -p /etc/ssl/nginx


Step 3) Log in to NGINX Customer Portal and download the following two files.

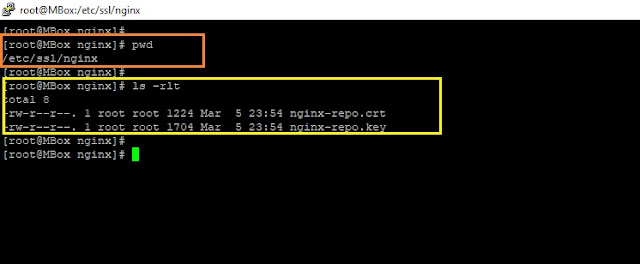
nginx-repo.key
nginx-repo.crt


Step 4) Copy the above two files to the RHEL/CentOS/Oracle Linux server into "/etc/ssl/nginx/" directory. Use your SCP client or other secure file transfer tools.


Step 5) Install prerequisite packages.

Command:
sudo yum install ca-certificates

this step will install CA-certificates to your local OS server from REDHAT.


Step 6) Add NGINX Plus repository by downloading the file nginx-plus-7.4.repo to "/etc/yum.repos.d"

Download the "nginx-plus-7.4.repo" and copy this file to "/etc/yum.repos.d" location.


Step 7) Install the NGINX Plus package.

Command:
sudo yum install nginx-plus


Step 8) Check the nginx binary version.

Command:
nginx -v

OR

Command:
nginx -V


Step 9) start the Nginx.
Command:
nginx


Step 10) To verify that NGINX is returning requests.

Command:
curl localhost


****************************************************************


  • "Nginx" directories and its descriptions.    
Directories
Descriptions.
/etc/nginx/
Config dir.
/etc/nginx/nginx.conf
Master/Global config file.
/usr/share/nginx/html
Document root directory
/etc/nginx/conf.d
Extra configuration files.
/var/log/nginx
log location folder (access.log & error.log).
/usr/sbin/nginx
Main nginx file location.


  • "Nginx" useful commands and its descriptions.

Commands
Descriptions.
nginx -s  [signal]
Signal (Where signal may be one of the following).
nginx -s  stop
Fast Shutdown.
nginx -s quit
Graceful shutdown (to stop Nginx processes with waiting for
the worker processes to finish serving current requests).
nginx -s reload
Reloading the configuration file (Changes made in the configuration file will not be applied until the command to reload configuration is sent to Nginx or it is restarted).
nginx  -s reopen
Reopening the log files.
nginx   -t
To test the configuration file (nginx.conf).
nginx   -T
To test configuration, dump it and exit.
nginx  -V
Show the version and configure options then exit.
nginx  -v
Show version and exit.
nginx  -h
This is print help.
nginx  -c  filename
Specify which configuration file NGINX should use instead of the default.
nginx  -T | less
To test configuration, dump it &  page wise view.


Nginx-Docs link:
https://drive.google.com/drive/folders/1jg43W_m0D72tKU5yK4nVEqUuLEYy3pP9


Reference links :
https://cs.nginx.com/repo_setup
https://www.nginx.com/products/nginx/#features
https://www.nginx.com/free-trial-request
https://www.nginx.com/blog/performance-tuning-tips-tricks/

Thanks :-)


Sunday 23 February 2020

WebSphere ND Migration 7.0 to 8.0 / 9.0 on Same Machine.

Prequesties check:
1. Check O.S prerequisites.
2. Source WAS 7.0 should be completely stopped.
3. Disk space needs to be there. 
4. Targeted WAS 8.0 / 9.0 needs to be installed on a machine.
5. Increase the number of open files limits on the O.S level (ulimit -a).


Tools for Migration
a) Migration 9 GUI based (WCT tool).
b) Command-line (i) WASPreUpgrade (ii) WASPostUpgrade


I have three profiles in existing WAS 7.0(in my scenario), 
a) Dmgr01
b) Custom01
c) Custom02

NOTE: Before proceeding always take config or profile backup.


*****************************************************************************************************
Commands for backup.

a) Dmgr01 backup

Command:
./backupConfig.sh /app/WAS7-APP-ND/IBM/WebSphere/AppServer/profiles/Mig-Backup_Dmgr01.zip   
-profileName Dmgr01 


 b) Custom01 backup

Command:
./backupConfig.sh /app/WAS7-APP-ND/IBM/WebSphere/AppServer/profiles/Mig-Backup_Custom01.zip   
-profileName Custom01 


*****************************************************************************************************

  • Install New instance of WAS 8.0 / 9.0 on Machine.
  • IMP NOTE: Before proceeding, need to create the same profiles in WAS 8.0 / 9.0  with having the same nodeName, cell namehostname, servers instances & no applications.

*****************************************************************************************************

A) create the same profile "Dmgr01" in WAS 8.0 having same nodeName, cellName,  hostname , server instance & with no applications.

Command:
/app/WAS8-APP-ND/IBM/WebSphere/AppServer/bin/manageprofiles.sh -create   
-profileName Dmgr01 
-profilePath /app/WAS8-APP-ND/IBM/WebSphere/AppServer/profiles/Dmgr01   
-templatePath /app/WAS8-APP-ND/IBM/WebSphere/AppServer/profileTemplates/management   
-serverType DEPLOYMENT_MANAGER   
-nodeName Dmgr01Node  -cellName Dmgr01NodeCell -hostName MBox  -defaultPorts 
-enableAdminSecurity true -adminUserName was -adminPassword was123


B) create the same profile "Custom01" in WAS 8.0 / 9.0 having the same nodeName, cellName,  hostname, server instance & with no applications installed.

Command:
/app/WAS8-APP-ND/IBM/WebSphere/AppServer/bin/manageprofiles.sh -create  
-profileName Custom01 -defaultPorts  
-profilePath /app/WAS8-APP-ND/IBM/WebSphere/AppServer/profiles/Custom01  
-templatePath /app/WAS8-APP-ND/IBM/WebSphere/AppServer/profileTemplates/managed  
-nodeName Custom01Node  -cellName Custom01Cell  -hostName MBox -federateLater true


*****************************************************************************************************


Create a folder on targeted WAS 8.0, to place WASPreUpgrade migration command files.

Command:
mkdir -p /app/WAS8-APP-ND/IBM/WebSphere/WASMigration/Dmgr01
mkdir -p /app/WAS8-APP-ND/IBM/WebSphere/WASMigration/Custom01
mkdir -p /app/WAS8-APP-ND/IBM/WebSphere/WASMigration/Custom02


WASPreUpgrade 

  • NOTE: Stop all the WAS services on 7.0.
  • Run WASPreUpgrade command from WAS8-APP-ND/IBM/WebSphere/AppServer/bin/ for "Dmgr01" profile.


Command:
/app/WAS8-APP-ND/IBM/WebSphere/AppServer/bin/WASPreUpgrade.sh   
/app/WAS8-APP-ND/IBM/WebSphere/WASMigration/Dmgr01  
/app/WAS7-APP-ND/IBM/WebSphere/AppServer/    
-traceString Migration.Flow=finer:Migration.*=fine   
-traceFile /app/WAS8-APP-ND/IBM/WebSphere/WASMigration/Dmgr01_WASPreUpgrade.trace  
-oldProfile Dmgr01   -username was   -password was123 


Reference URL :
https://www.ibm.com/support/knowledgecenter/en/SSEQTP_8.5.5/com.ibm.websphere.migration.base.doc/ae/rmig_WASPreUpgrade.html

Syntax
*********************************************************************************
WASPreUpgrade.sh backupDirectory 
                 currentWebSphereDirectory
                 [-traceString trace_spec [-traceFile file_name ]]
                 [-machineChange true | false]
                 [-oldProfile profile_name]
                 [-workspaceRoot profile1=user_workspace_folder_name_1;profile2=user_workspace_folder_name_2]
                 [-username < user name >]
                 [-password < password >]
                 [-javaoption < -Xms...m > -javaoption < -Xmx...m > ]
                 [-requireEmbeddedDBMigration true | false]
                 [-keepDmgrEnabled true | false]
*********************************************************************************

Similarly  

  • Run WASPreUpgrade command from WAS8-APP-ND/IBM/WebSphere/AppServer/bin/ for "Custom01" profile.

Command:
/app/WAS8-APP-ND/IBM/WebSphere/AppServer/bin/WASPreUpgrade.sh   
/app/WAS8-APP-ND/IBM/WebSphere/WASMigration/Custom01  
/app/WAS7-APP-ND/IBM/WebSphere/AppServer/    
-traceString Migration.Flow=finer:Migration.*=fine   
-traceFile /app/WAS8-APP-ND/IBM/WebSphere/WASMigration/Custom01_WASPreUpgrade.trace  -oldProfile Custom01   -username was   -password was123 


*********************************************************************************

*********************************************************************************

WASPostUpgrade 
  • Run WASPostUpgrade command from WAS8-APP-ND/IBM/WebSphere/AppServer/bin/ for "Dmgr01" profile.


Command:
/app/WAS8-APP-ND/IBM/WebSphere/AppServer/bin/WASPostUpgrade.sh  
/app/WAS8-APP-ND/IBM/WebSphere/WASMigration/Dmgr01  
-oldProfile Dmgr01  -profileName Dmgr01 -scriptCompatibility true   
-replacePorts false  -includeApps true  -keepAppDirectory false  
-traceString Migration.Flow=finer:Migration.*=fine 
-traceFile /app/WAS8-APP-ND/IBM/WebSphere/WASMigration/Dmgr01_WASPostUpgrade.trace 
-username was   -password was123


https://www.ibm.com/support/knowledgecenter/SS7K4U_8.5.5/com.ibm.websphere.migration.nd.doc/ae/rmig_WASPostUpgrade.html

Syntax: 
*****************************************************************************************************
WASPostUpgrade.sh backupDirectory
                     [-username userID]
                     [-password password]
                     [-oldProfile profile_name]
                     [-profileName profile_name]
                     [-scriptCompatibility true | false]
                     [-portBlock port_starting_number]
                     [-backupConfig true | false]
                     [-replacePorts true | false]
                     [-includeApps true | false | script]
                     [-keepDmgrEnabled true | false]
                     [-requestTimeout seconds]
                     [-javaoption -Xms...m -javaoption -Xmx...m]
                     [[-appInstallDirectory user_specified_directory] | 
                      [-keepAppDirectory true | false]]
                     [-traceString trace_spec [-traceFile file_name]]
*****************************************************************************************************


IMP NOTE:
Start the Dmgr01 profile, and force delete the already federate nodes in dmgr from DMGR console.
Since it contains WAS 7.0 node agents.


  • Run WASPostUpgrade command from WAS8-APP-ND/IBM/WebSphere/AppServer/bin/ for "Custom01" profile.


Command:
 /app/WAS8-APP-ND/IBM/WebSphere/AppServer/bin/WASPostUpgrade.sh  
/app/WAS8-APP-ND/IBM/WebSphere/WASMigration/Custom01  
-oldProfile Custom01  -profileName Custom01 -scriptCompatibility true   -replacePorts false  
-includeApps true  -keepAppDirectory false  
-traceString Migration.Flow=finer:Migration.*=fine 
-traceFile /app/WAS8-APP-ND/IBM/WebSphere/WASMigration/Custom01_WASPostUpgrade.trace -username was   -password was123


NOTE: The above command will automatically federate the node, with the running Dmgr01 profile.


For understanding.
  1. stop WAS 7.0 services & profiles completely.
  2. take existing WAS 7.0 Backup.
  3. install WAS 8.0 and create same profiles on new WAS 8.0 /9.0 , having same nodeName, cellName,  hostname, server instance & with no applications.
  4. Run $WAS8_HOME/bin/WASPreUpgrade command, & save the pre upgrades migration files.
  5. Run $WAS8_HOME/bin/WASPostUpgrade command & for Dmgr01.
  6. Start WAS 8.0 Dmgr01 and force delete the nodes of WAS7.0
  7. Run $WAS8_HOME/bin/WASPostUpgrade command for Custom01, (it will automatically federate the nodes with WAS8.0 dmgr01)
  8. Do the same for Custom02 also.
  9. Clear all profiles wstemp, temp, tranlog & logs files.
  10. federate the nodes with dmgr and start node & servers instances.

Reference links: 

Thanks :-)


Friday 21 February 2020

WebSphere Application Server 7.0.0.X & FIXPACK install / Update on the non-default location.

Step 1: Download the WAS 7 binaries.


Step 2: Extract the above binaries.


Step 3: Use the "install" command for silent installation on the WAS7/WAS folder.


Step 4: Use below command for WebSphere Application Server 7.0.0.0 installation.

NOTE: Create an installation folder.
"/app/WAS7-APP/IBM/WebSphere/AppServer"

Command:-

./install  -silent -OPT silentInstallLicenseAcceptance="true" -OPT allowNonRootSilentInstall="false"  -OPT disableOSPrereqChecking="true" -OPT disableNonBlockingPrereqChecking="true" -OPT checkFilePermissions="true" -OPT installType="installNew" -OPT profileType="none" -OPT feature="samplesSelected" -OPT feature="languagepack.console.all" -OPT feature="languagepack.server.all" -OPT installLocation="/app/WAS7-APP/IBM/WebSphere/AppServer"


Step 5: Create a default (application-server) profile using "manageprofiles" command.

Command:-

./manageprofiles.sh -create -profileName AppSrv01 -profilePath "/app/WAS7-APP/IBM/WebSphere/AppServer/profiles/AppSrv01" -templatePath "/app/WAS7-APP/IBM/WebSphere/AppServer/profileTemplates/default" -enableAdminSecurity false


Step 6: Install UpdateInstaller setup tool.

NOTE: UpdateInstaller is used for FIXPACK upgrade (install) & FIXPACK downgrade (uninstall).

Command:-

./install -silent -OPT silentInstallLicenseAcceptance="true" -OPT -OPT allowNonRootSilentInstall="false" -OPT disableOSPrereqChecking="true" -OPT disableEarlyPrereqChecking="true" -OPT installLocation="/opt/IBM/WebSphere/UpdateInstaller" -OPT traceFormat=ALL


Step 7: SDK install "7.0.0-WS-WASSDK-LinuxX64-FP0000043.pak" on the WAS application server.

Copy the downloaded "7.0.0-WS-WASSDK-LinuxX64-FP0000043.pak"  to "/opt/IBM/WebSphere/UpdateInstaller/maintenance" folder.

NOTE:  Take reference from file  "/opt/IBM/WebSphere/UpdateInstaller/responsefiles/install.txt"

Command:-

./update.sh  -silent -OPT checkFilePermissions="true" -W maintenance.package=/opt/IBM/WebSphere/UpdateInstaller/maintenance/7.0.0-WS-WASSDK-LinuxX64-FP0000043.pak -OPT disableNonBlockingPrereqChecking="true" -W product.location=/app/WAS7-APP/IBM/WebSphere/AppServer -W update.type="install"

OR

/opt/IBM/WebSphere/UpdateInstaller/java/jre/bin/java -cp /opt/IBM/WebSphere/UpdateInstaller/update.jar -Xms256m -Xmx512m run -silent -OPT checkFilePermissions=true -W maintenance.package=/opt/IBM/WebSphere/UpdateInstaller/maintenance/7.0.0-WS-WASSDK-LinuxX64-FP0000043.pak -OPT disableNonBlockingPrereqChecking=true -W product.location=/app/WAS7-APP/IBM/WebSphere/AppServer -W update.type=install


Step 8: FIXPACK Update "7.0.0-WS-WAS-LinuxX64-FP0000043.pak" on the WAS application server.

Copy the downloaded "7.0.0-WS-WAS-LinuxX64-FP0000043.pak" to "/opt/IBM/WebSphere/UpdateInstaller/maintenance" folder.

take reference from file  "/opt/IBM/WebSphere/UpdateInstaller/responsefiles/install.txt"

Command:-

/opt/IBM/WebSphere/UpdateInstaller/java/jre/bin/java -cp /opt/IBM/WebSphere/UpdateInstaller/update.jar -Xms256m -Xmx512m run -silent -OPT checkFilePermissions=true -W maintenance.package=/opt/IBM/WebSphere/UpdateInstaller/maintenance/7.0.0-WS-WAS-LinuxX64-FP0000043.pak -OPT disableNonBlockingPrereqChecking=true -W product.location=/app/WAS7-APP/IBM/WebSphere/AppServer -W update.type=install


Thanks :-)