A domain controller is the central point from which the domain is controlled. It ensures that each server is configured according to the management policy of the domain.
A host controller is a physical or virtual host that interacts with the domain controller to control the lifecycle of the application server instances running on its host and to assist the domain controller to manage them. Each host can contain multiple server groups.
A server group is a set of server instances which have JBoss EAP installed on them and are managed and configured as one. The domain controller manages the configuration of and applications deployed onto server groups. Consequently, each server in a server group shares the same configuration and deployments.
**Managed Domain Configuration Files**
Configuration File
|
Purpose
|
domain.xml
|
This is the main configuration file for a managed domain. Only
the domain master reads this file. This file contains the configurations for
all of the profiles
(default, ha, full, full-ha, load-balancer).
|
host.xml
|
This file includes configuration details specific to a
physical host in a managed domain, such as network interfaces, socket
bindings, the name of the host, and other host-specific details. The host.xml file includes all of
the features of both host-master.xml and host-slave.xml, which are described below.
|
host-master.xml
|
This file includes only the configuration details necessary to
run a server as the master domain controller.
|
host-slave.xml
|
This file includes only the configuration details necessary to
run a server as a managed domain host controller.
|
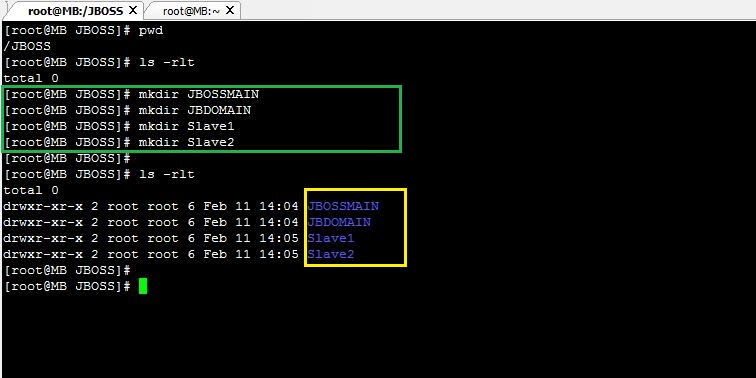
Step 1: Create four folders listed below.
(i) JBOSSMAIN
(ii) JBDOMAIN
(iii) Slave1
(iv) Slave2
Screenshot :
Step 2: Copy the JBOSS EAP 7.1 to JBOSSMAIN folder and unzip.
Command : unzip jboss-eap-7.1.0.Alpha.zip
Screenshot :
Step 3: Navigate to JBOSSMAIN/jboss-eap-7.1/bin and run add-user.sh
Screenshot :
We have successfully added user.
Step 4: Now copy domain folder from JBOSSMAIN/jboss-eap-7/domain to JBDOMAIN , Slave1 and Slave2.
Screenshot :
Step 5 : Navigate to copied /JBOSS/JBDOMAIN/domain/configuration
Screenshot :
Step 6: We have to edit two configuration files host-master.xml & domain.xml
Screenshot :
Step 7 : Before editing always take backup of configuration file, Edit host-master.xml.
(i) Replace the <host xmlns="urn:jboss:domain:5.0" name="master"> with
<host xmlns="urn:jboss:domain:5.0" name="Domain-master">
Screenshot :
(ii) Review the Domain controller configuration:
Screenshot :
(iii) Review the management address parameters.
(iv) Review native port of domain controller.
(v) Review HTTP port to access the management interface.
Screenshot :
(vi) Change management address of the domain controller with your machine IP.
Screenshot :
Step 8 : Navigate to /JBOSS/JBDOMAIN/domain/configuration and edit domain.xml file.
Now add the groups in order primary-server-group and secondary-server-group to the Domain-controller server-groups.
#####################################################################
<server-groups>
<server-group name="primary-server-group" profile="full">
<jvm name="default">
<heap size="1000m" max-size="1000m"/>
<permgen max-size="256m"/>
</jvm>
<socket-binding-group ref="full-sockets"/>
</server-group>
<server-group name="secondary-server-group" profile="full">
<jvm name="default">
<heap size="1000m" max-size="1000m"/>
<permgen max-size="256m"/>
</jvm>
<socket-binding-group ref="full-sockets"/>
</server-group>
</server-groups>
###################################################################
Where, permgen tag is optional.
Before Change
Screenshot :
After Change
Screenshot :
Step 9 : Start the domain controller using below command from "/JBOSS/JBOSSMAIN/jboss-eap-7.1/bin/".
/JBOSS/JBOSSMAIN/jboss-eap-7.1/bin/domain.sh --host-config=host-master.xml -Djboss.domain.base.dir=/JBOSS/JBDOMAIN/domain &
http://192.168.43.79:9990/console/
Screenshot :
Screenshot :
Screenshot :
Nice :-) , now the domain configuration is done.
$$$$$$$$$$$$$$$$$$$$$$$$$$$$$$$$$$$$$$$$$$$$$$$$$$$$$$$$$$$$$$$$$
Now, Configure the Host Controller on Slave1 and Slave2
Step 1: Navigate to /Slave1/domain/configuration and edit host-slave.xml
Register the Slave1 with domain controller using name"Slave1".
Screenshot :
Step 2 : Review the native management interface port on Slave1 to avoid port conflicts also check , management address , domain-controller.
Add management IP address in "<domain-controller>" tag
Before change
Screenshot :
After Change
Screenshot :
Step 3 : Edit <servers> tag and add the number of servers with dedicated "JVM" heap for groups.
IMP NOTE : Use different port offset for each "JVM ".
"<socket-bindings port-offset="100"/>" & "<socket-bindings port-offset="200"/> "
Before change
Screenshot :
After Change
Screenshot :
###################################################################
<servers>
<server name="Server1" group="primary-server-group">
<jvm name="default">
<heap size="164m" max-size="256m"/>
</jvm>
<socket-bindings port-offset="100"/>
</server>
<server name="Server2" group="secondary-server-group">
<jvm name="default">
<heap size="264m" max-size="356m"/>
</jvm>
<socket-bindings port-offset="200"/>
</server>
</servers>
#################################################################
Step 4 : start the Slave1 host controller with the following command.
/JBOSS/JBOSSMAIN/jboss-eap-7.1/bin/domain.sh --host-config=host-slave.xml -Djboss.domain.base.dir=/JBOSS/Slave1/domain &
Screenshots:
Check through console,
http://192.168.43.79:9990/console/
$$$$$$$$$$$$$$$$$$$$$$$$$$$$$$$$$$$$$$$$$$$$$$$$$$$$$$$$$$$$$$$$$$$$
$$$$$$$$$$$$$$$$$$$$$$$$$$$$$$$$$$$$$$$$$$$$$$$$$$$$$$$$$$$$$$$$$$$$
$$$$$$$$$$$$$$$$$$$$$$$$$$$$$$$$$$$$$$$$$$$$$$$$$$$$$$$$$$$$$$$$$$$$
$$$$$$$$$$$$$$$$$$$$$$$$$$$$$$$$$$$$$$$$$$$$$$$$$$$$$$$$$$$$$$$$$$$$
Now, similarly Configure the - Slave2 instance as per previous step.
NOTE :
(i) Add name "Slave2" on host.
(ii) Change native management interface port for slave2 host and management address , domain-controller.
(iii) use different "<socket-bindings port-offset="220"/> " for servers3 and server4 .
Step : start the Slave2 host controller with the following command:
/JBOSS/JBOSSMAIN/jboss-eap-7.1/bin/domain.sh --host-config=host-slave.xml -Djboss.domain.base.dir=/JBOSS/Slave2/domain &
Screenshots
JBOSS PORTS :

Reference link,
https://developers.redhat.com/blog/jboss-eap-7-domain
Next topic : JBoss EAP 7 - DOMAIN DEPLOYMENT - GUI CONSOLE MODE.