Menu

Saturday 28 December 2019

How to Create a Clone of any profiles on WAS.

Eg: Suppose we already have a profile AppSrv01, need to create an exact copy existing profile,
        with different name AppSrv02 and more.

NOTE: Before proceeding towards any changes, take profiles or Config backup.


BACKUP Config command:

Navigate to $WAS_HOME/bin

./backupConfig.bat /app/IBM/WebSphere/AppServer/AppSrv01_ConfigDDMMYY.zip 
-profileName AppSrv01 
-username wasadmin 
-password was@123 
-trace 
–nostop


BACKUP Profile command:

./manageprofiles.bat 
-backupProfile 
-profileName AppSrv01 
-backupFile /app/IBM/WebSphere/AppServer/AppSrv01_PROFILE_DDYYMM.zip


********************************************************************************

Step 1.  Make sure that the server is shutdown.
 
Step 2.  Copy the existent profile from Profiles/<oldProfile> to Profiles/<newProfile>
 
Step 3.  Update Path WAS_USER_SCRIPT in Profiles\<newProfile>\bin\setupCmdLine.bat
 
Step 4.  Update Path USER_INSTALL_ROOT in Profiles\<newProfile>\bin\setupCmdLine.bat
 
Step 5.  Update property user.root in Profiles\<newProfile>\properties\ssl.client.props
 
Step 6.  Replace all occurences of <oldProfile> with <newProfile> in Profiles\<newProfile>\firststeps\firststeps.bat
 
Step 7.  Edit AppServer\properties\profileRegistry.xml. 
             Make a copy of the <oldProfile> and update the tag values with the <newProfile>. 

Should look something like this:
 <profile isAReservationTicket="false" isDefault="false" name="newProfile" path=".....\Profiles\newProfile" template=".......\AppServer\profileTemplates\default"/>


Step 8.  Copy AppServer\properties\fsdb\<oldProfile>.bat to AppServer\properties\fsdb\<newProfile>.bat. 

This step will make the profile available to "AppServer\bin\manageprofiles.bat -listProfiles"
 
Step 9.  Edit <newProfile>/config/cells/<cell>/nodes/<node>/variables.xml. Update the USER_INSTALL_ROOT path.
 
Step 10. Update the path of  WAS_USER_SCRIPT in AppServer\properties\fsdb\<newProfile>.bat


********************************************************************************


Thanks :-)


Friday 27 December 2019

Install SDK 8.0 on Websphere 8.5.5.9+ using Command method.

Install SDK 8.0 on Websphere 8.5.5.9+ using the Command method.

NOTE: SDK 8.0 supports From 8.5.5.9 only


Step 1: Locate to IM_installed/elipse/tools.

Step 2: The imcl script Command is used to install Websphere SDK.

Step 3: List the available SDK packages ID in the binaries.

Command:

./imcl listAvailablePackages -repositories /home/wasadmin/SDK_8.0/repository.xml


Screenshot:

*********************************************************************************


Step 4: Command to install SDK 8.0 for Websphere 8.5.5.9+ servers

./imcl install com.ibm.websphere.IBMJAVA.v80_8.0.5027.20190128_1626 
-repositories /home/wasadmin/SDK_8.0/repository.xml 
-installationDirectory /app/IBM_8.5.5.X/WebSphere/AppServer 
-acceptLicense -record /app/IBM_8.5.5.X/WebSphere/AppServer/SDK_8_apply.xml –sP


Where,

install : will check already installed WAS version, then proceed for installation.
installationDirectory: for installation directory locaion.
-acceptLicense: to accept terms and conditions.
record: to record installation steps, .xml format can be used for future silent installation or update.

Screenshot:


Step 5: USE below commands to set SDK 8.0  as default for WebSphere.

Locate to $WAS_HOME/bin/


  • ./managesdk.sh -listAvailable


CWSDK1003I: Available SDKs :
CWSDK1005I: SDK name: 1.6_64
CWSDK1005I: SDK name: 1.8_64
CWSDK1001I: Successfully performed the requested managesdk task.


  • ./managesdk.sh -setNewProfileDefault -sdkName 1.8_64


CWSDK1022I: New profile creation will now use SDK name 1.8_64.
CWSDK1001I: Successfully performed the requested managesdk task.


  • ./managesdk.sh -enableProfile -profileName AppSrv01 -enableServers -sdkname 1.8_64

CWSDK1017I: Profile AppSrv01 now enabled to use SDK 1.8_64.

CWSDK1001I: Successfully performed the requested managesdk task.


Thanks :-)

Install or Update FIXPACK on WebSphere 8.5.+

Install or Update FIXPACK on WebSphere 8.5.5+

Step 1: Locate to IM_installed/elipse/tools.

Step 2: The imcl script Command is used to install Websphere Fixpack

Step 3: List the available FIXPACK packages in the binaries.

Command:

./imcl listAvailablePackages -repositories /home/wasadmin/WAS_FP/repository.xml


Screenshot:


************************************************************************************

Step 4: Two Commands are there  to update/install + offering ID

Command:

./imcl updateAll  
-repositories /home/wasadmin/WAS_FP/repository.xml  
-installationDirectory  /app/IBM_8.5.5.X/WebSphere/AppServer  
-acceptLicense  
-record /app/IBM_8.5.5.X/WebSphere/AppServer/fixpack_apply.xml  -sP


Where,
updateAll : will check already installed WAS version, then proceed for installation.
installationDirectory: for the installation directory.
-acceptLicense: to accept terms and conditions.
record: to record installation steps, .xml format can be used for future silent installation or update.


OR

./imcl install [offering_ID_offering_version]  
-repositories /home/wasadmin/WAS_FP/repository.xml  
-installationDirectory  /app/IBM_8.5.5.X/WebSphere/AppServer  
-acceptLicense  
-record /app/IBM_8.5.5.X/WebSphere/AppServer/fixpack_apply.xml  -sP


NOTE:  Recommended FIXPACK 8.5.5.12 needed JAVA SE 8+ 

From  (since 8.5.5.9) JAVA SE 8.


Screenshot:


Step 5: Check the version of WebSphere using  versioninfo.sh script.
locate to $WAS_HOME/bin/

Command:

$WAS_HOME/bin/versioninfo.sh


Thanks :-)

Websphere Base or ND Installation using Command:

Websphere Base or ND Installation using Command:

Step 1: Locate to IM_installed/elipse/tools.

Step 2: The imcl script Command is used to install Websphere on the non-default default location.

Step 3: List the available packages in the binaries.

Command:

./imcl  listAvailablePackages
 -repositories   /home/wasadmin/WAS_8.5_BASE/repository.config

Where,

imcl: script for command method.
listAvailablePackages: This flag is used to check available packages in binaries.
repositories: to fetch binaries details.


Screenshot:


******************************************************************************************

Step 4: Command.

./imcl install com.ibm.websphere.BASE.v85_8.5.5000.20130514_1044 -acceptLicense 
-repositories /home/wasadmin/WAS_8.5_BASE/repository.config 
-installationDirectory /app/IBM_8.5.5.X/WebSphere/AppServer 
-sharedResourcesDirectory /app/IBM_8.5.5.X/IMShared  
-record /app/IBM_8.5.5.X/WebSphere/AppServer/response_WebSphereAppServer.xml –sP


Where,

install: Flag to install WAS_8.
com.ibm.websphere.BASE.v85_8.5.5000.20130514_1044: WebSphere package ID&version.
installationDirectory: For installation directory location.
sharedResourcesDirectory: Websphere libraries resources directory.
record: To record installation steps, .xml format can be used for future silent installation.
-sP : For progress status.


Screenshot:


Thanks :-)

Installation Manager (IM) on non-default location.

Installation Manager (IM) on non-default location.

What is IM?

Installation Manager is a tool that you can use to install and maintain your IBM software packages. 
The following steps can perform the install, modify, update, rollback, or uninstall your IBM products.


Step 1: Extract IM setup.

Step 2: Locate to $IM_SETUP/installc script for Installation using for command method.

Step 3: NOTE: Create a folder for "IM_installed" &  "IM_logs" on the installation path.

Command:

./installc -acceptLicense  
-installationDirectory /app/IBM_8.5.5.X/InstallationManager/IM_installed  
-record /app/IBM_8.5.5.X/InstallationManager/install.xml 
-dataLocation /app/IBM_8.5.5.X/InstallationManager/IM_logs 
–showProgress


Where,

installc: Script for command method.
installationDirectory: Installation directory location.
record: To record installed steps.
dataLocation: For IMP installation Manager logs.
showProgress : For installation status.


Screenshot:


Thanks :-)

Wednesday 29 May 2019

What is JBoss? What is JBoss Domain Management ?

What is JBoss?
  • JBoss is a Middleware application server like a Weblogic, Websphere application server, glassfish and many more.
  • Initially, JBoss is an opensource and cross-platform application server, then it is acquired by REDHAT.
  • JBoss is still available as an opensource now it is named as Wildfly application server.
  • The new version is Wildfly16 & Redhat JBoss EAP version 7.2

Red Hat JBoss Enterprise Application Platform 7
  • Red Hat JBoss Enterprise Application Platform (JBoss EAP) 7.1 is a certified implementation of the Java Enterprise Edition (Java EE) 7 full platform and Web Profile specifications.
  • Major versions of JBoss EAP are forked from the WildFly community
  • JBoss EAP 7.1 is similar to WildFly 11.
  • JBoss EAP provides two operating modes for JBoss EAP instances: standalone server or a managed domain
  • The standalone server operating mode represents running JBoss EAP as a single server instance. 
  • The managed domain operating mode allows for the management of multiple JBoss EAP instances from a single control point.

Features of JBoss EAP
  • Java EE 7 compliant (Build using JAVA 7)
  • Managed Domain (high availability) 
  • Management console and management CLI (command line utility)
  • Simplified directory layout (Domain & Standalone directory separate) 
  • Modular class-loading mechanism (stop & restart time enhanced)
  • Streamlined datasource management (datasource can be configure using cli / console)
  • Patching (command & console)  & upgradation. (using tool)


The standalone server operating mode represents running JBoss EAP as a single server instance. 

The managed domain operating mode allows for the management of multiple JBoss EAP instances from a single control point.

Below is the snap of Standalone & Domain topology.


********************************************************************************************

What is Domain Management?
  • DOMAIN MANAGEMENT (CENTRAL MANAGEMENT POINT)
  • The domain system provides management of multiple JBoss instances from a single control point.
  • A domain consists of one domain controller, one or more host controllers, and zero or more server groups per host.
  • 1 (domain controller ) << >>  1 or more (host controller)  << >>  0  or more server groups per host


  1. A domain controller is a central point from which the domain is controlled. The domain controller is also a host controller.
  2. A host controller is a physical or virtual host that interacts with the domain controller to control the lifecycle of the application server. Each host can contain multiple server groups.
  3. A server group is a set of server instances which have JBoss EAP installed on them and are managed and configured as one. The domain controller manages the configuration of and applications deployed onto server groups. 

Domain Controller:
  1. Default configuration file: EAP_HOME/domain/configuration/domain.xml
  2. The domain.xml file contains profiles (default, ha, full & full-ha) for servers.
  3. A Profile contains the detailed settings of the various subsystems available in that profile. The domain configuration also includes the definition of socket groups and the server group definitions.
NOTE:

A JBoss EAP 7 domain controller is able to administer JBoss EAP 6 hosts and servers, as long as the hosts and servers are running JBoss EAP 6.2 or later.

********************************************************************************************


What are Subsystems, Extensions, and Profiles?
  • JBoss works on subsystems: Eg. For instance, if an application requires a database, a datasource can be configured in the datasources subsystem and accessed by that application after it is deployed to that JBoss EAP server or domain.
  • Extensions: An extension is a module that extends the core functionality of the server. Extensions are loaded as they are needed by deployments, and are unloaded when they are no longer needed.
  • Profiles: Profile is a set of subsystems combined for different purposes. For domain-mode, four profiles are defined by default. (default, ha, full, full-ha) For standalone-mode, an un-named profile is set.

Configuration File
Purpose
standalone.xml
This standalone configuration file is the default configuration that is used when you start your standalone server. It contains all information about the server, including subsystemsnetworkingdeploymentssocket bindings, and other configurable details. It does not provide the subsystems necessary for messaging or high availability.
standalone-ha.xml
This standalone configuration file includes all of the default subsystems and adds the modcluster and jgroups subsystems for high availability. It does not provide the subsystems necessary for messaging.
standalone-full.xml
This standalone configuration file includes all of the default subsystems and adds the messaging-activemq and iiop-openjdk subsystems. It does not provide the subsystems necessary for high availability.
standalone-full-ha.xml
This standalone configuration file includes support for every possible subsystem, including those for messaging and high availability.
standalone-load-balancer.xml
This standalone configuration file includes the minimum subsystems necessary to use the built-in mod_cluster front-end load balancer to load balance other JBoss EAP instances.


Reference link :
https://access.redhat.com/documentation/en-us/red_hat_jboss_enterprise_application_platform/7.2/html/configuration_guide/index
https://access.redhat.com/documentation/en-us/
https://developer.jboss.org/thread/266415


Thanks :-)


Tuesday 28 May 2019

Types of GC , analyze GC logging and REDHAT JVM Tool.

1. Serial Garbage Collector.
2. Parallel Garbage Collector.
3. CMS Garbage Collector.
4. G1 Garbage Collector.


1. Serial Garbage Collector (-XX:+UseSerialGC):-

  • The serial GC works on a single thread to perform Garbage Collection. 
  • It is best for single core processor machine.
  • While performing GC, it's stop/freezes all the threads of application(Stop The World).
  • The (-XX:+UseSerialGC) argument have to be used on JVM configuration, to enable Serial Garbage Collector.


2. Parallel Garbage Collector (-XX:+UseParallelGC):-

  • The Parallel  GC works on multiple threads to perform Garbage Collection also known as the throughput collector.
  • Similar to serial, it also freezes all the threads of application(Stop The World).
  • The Parallel collector uses multiple CPU  to perform Garbage Collection.
  • This is default GC collector on most of JVM machines.
  • Parallel GC can be enabled using  (-XX:+UseParallelGC) argument on JVM.
  • Only minor collections are executed in parallel using (-XX:+UseParallelGC) argument.
  • For minor and major collections in parallel GC, we have to put (-XX:+UseParallelOldGC) argument on JVM.
  • The number of GC threads can be controlled with the command line option (-XX: ParallelGCThreads=<N>) argument on JVM.


3. CMS Garbage Collector (-XX:+UseConcMarkSweepGC):-

  • The CMS stands for Concurrent Mark Sweep (CMS) Garbage Collector. 
  • The CMS uses multiple threads to perform Garbage Collection.
  • Here the Garbage Collection is done concurrently with the application threads. hence it reduces the pause time.
  • This garbage collector is entered stop the world mode only in two cases,
  • 1. During marking the referenced objects in the old generation space.
  • 2. Any change in heap memory in parallel with doing the garbage collection.
  • So, (Stop The World) STW time of CMS garbage collector is very short.


4. G1 Garbage Collector (–XX:+UseG1GC):-

  • It is the new GC, experimental start on JDK 6update 14 then it is being introduced and supported in JDK 7 update 4.
  • The G1 uses multiple threads to scan the heap and divides it into the regions.
  • The heap is split into approximately 2000 regions.
  • The regions are spanning from minimum size 1MB to maximum size 32MB. (-XX:G1HeapRegionSize).
  • The G1 collector is a parallel, concurrent and compacting low-pause garbage collector.
  • To enable the G1 collector use (-XX:+UseG1GC) argument on JVM.

*****************************************************************************

Logging in Garbage Collection:

Below is the listed flags, which enable the logging.

  • -XX:+PrintGC (or the alias -verbose:gc) Enable the simple logging mode which prints the logs on every minor or major GC.
  • -XX:+PrintGCDateStamps would print the absolute timestamp in the log statement.
  • -XX:+PrintGCDetails property would print the details of how much memory is reclaimed in each generation.
  • -XX:+PrintGCTimeStamps would Print timestamps at garbage collection. 
  • -Xloggc:<filename> makes Log GC verbose output to the specified file.

Below is the snap how to analyze GC logs,


Link:


*****************************************************************************

IMP Suggestion: The REDHAT labs team provided a JVM Options Configuration Tool online, Where you can get the best JVM argument suggestion.

Link:


Reference links:


Thanks :-)


Friday 24 May 2019

What is SSL, What is One-Way SSL & Two-Way SSL?

What is SSL?
  • SSL stands for “Secure Sockets Layer”.
  • SSL has been developed by Netscape.
  • The first released version 2.0 was declared in 1995.
  • It is Security technology used to encrypt the data between clients and server or website on browser, mails, etc.

 What is TLS?
  • TLS stands for “Transport Layer Security” protocol.
  • Later the SSL v3.0 has been replaced by TLS1.0
  • The TLS1.0, TLS1.1, TLS 1.2 is available, the TLS 1.3 is the newer version protocol released in 2018.

SSL works on “three basic principles”:

  • A.       Encryption.
  • B.       Authentication.
  • C.       Data Integrity.

A) Encryption: The data which is transferred between two or more Clients and Server should be encrypted. Since the attacker or hacker would unable to understand. 

B) Authentication: The data to be transferred must be to the correct person or user.

C) Data Integrity: The data over transmission should not be tampered or changed.


 SSL works on  “a key pair”:
a)       Public Key.
b)       Private Key.

a) Public Key
  •  As the name says public, means it is available to all people.
  • A public key is basically used for Authentication purpose (The Right Person/User).
  • A CSR (Certificate Signing Request) contains the user detail which is encrypted using the public key.
b) Private Key:
  • As the name says Private, means it is kept secret only available to the owner.
  • This key is having both functionalities of encrypting and decrypting the data during transmission.
  • The private key is generated while creating CSR in an encrypted format.

 Public key infrastructure (PKI) produces public and private keys.


*********************************************************************************

SSL (Secure Sockets Layer) HANDSHAKE :

Basically, the browser works on One-Way SSL authentication mechanism, Where the Client verifies/validates the server certificate with the list of CA's certification authority.
There are three keys are used to set up the SSL connection: (a)the public, (b) private, and (c) session keys.

The SSL connection can be made in two different ways:

A) One-Way SSL: In this method only client going to verifies, server certificates with the List of CA's certification authority.

B) Two-Way SSL: In this method, both client and server verify, each other certificates with the list of CA's certification authority.


A) One-Way SSL authentication

1. Client requests for data on HTTPS protocol to the server. That going to initiates the SSL/TLS handshake process. 

2. Server returns with its public certificate and public key to the client along with the server hello message.

3. The client validates/verifies the received server certificates with CA’s certification authority including certificate expiration, unrevoked and Common Name (CN – name).

4. The client sends back with a symmetric session key using the server’s public key.

5. The server decrypts the symmetric session key using its private key and sends back an encrypted session key to start the encrypted session.


B) Two-Way SSL (MUTUAL AUTHENTICATION) :

1. Client requests for data on HTTPS protocol to the server. That going to initiates the SSL/TLS handshake process. 

2. Server returns with its public certificate and public key to the client along with the server hello message.


3. The client validates/verifies the received server certificates with CA’s certification authority including certificate expiration, unrevoked and Common Name (CN – name).


4. The client sends back a client certificate with a symmetric session key using the server’s public key.


5. The server validates/verifies the received client certificates with CA’s certification authority for CA digital signed certificates, and checks its certificate expiration status.


6. After completion of the handshake process, client and server communicate and transfer data with each other encrypted with the secret keys shared between the two during a handshake.


Thanks :-)


Thursday 23 May 2019

Redirect traffic during maintenance or downtime using Apache.

Hi folks!
We have to redirect the traffic to the static HTML maintenance page,  during maintenance or downtime of the application using Apache server.

for this, we have to create a new static HTML maintenance page & maintenancepage.enable file.

   a. maintenancepage.html  
   b. maintenancepage.enable 
   c. Redirecting configurations in httpd.conf/ssl.conf file.


Step A: create a file "maintenancepage.html" and write below HTML code.

-----------------------------------------------------------------------------------

<!doctype html>
<title>Site Maintenance</title>
<style>
  body { text-align: center; padding: 150px; }
  h1 { font-size: 50px; }
  body { font: 20px Helvetica, sans-serif; color: #333; }
  article { display: block; text-align: left; width: 650px; margin: 0 auto; }
  a { color: #dc8100; text-decoration: none; }
  a:hover { color: #333; text-decoration: none; }
</style>

<article>
<h1>Application Name</h1>
    <h1>We&rsquo;ll be back soon!</h1>
    <div>
    <p>Sorry for the inconvenience but we&rsquo;re performing some maintenance at the moment. If you need to you can always <a href="mailto:#">contact us</a>, otherwise we&rsquo;ll be back online shortly!</p>
    <p>&mdash; The MiddlewareBox Team</p>
    </div>
</article>

-----------------------------------------------------------------------------------

Download the code from Github: https://gist.github.com/


Step B. Create a empty file called as "maintenancepage.enable" file.

This file is created to enable and disable maintenance page during no downtime, after configurations and restart of apache server.

If we delete the "maintenancepage.enable" file, it will not redirect the traffics.


NOTE IMP: Save both files in $APACHE_HOME/htdocs folder.

Step C.  Locate to $APACHE_HOME/conf folder and edit "httpd.conf" file and "httpd-ssl.conf", write below configurations.

------------------------------------------------------------------------------

LoadModule headers_module modules/mod_headers.so
LoadModule rewrite_module modules/mod_rewrite.so

RewriteEngine On
RewriteCond %{REMOTE_ADDR} !^127\.0\.0\.1
RewriteCond %{HTTP_HOST} !^localhost$ [NC]
RewriteCond %{DOCUMENT_ROOT}/maintenancepage.html -f
RewriteCond %{DOCUMENT_ROOT}/maintenancepage.enable -f
RewriteCond %{SCRIPT_FILENAME} !maintenancepage.html
RewriteRule ^.*$ /maintenancepage.html [R=503,L]
ErrorDocument 503 /maintenancepage.html
Header always Set Cache-Control "max-age=0, no-store" "expr=%{REQUEST_URI}=='/maintenancepage.html'"

------------------------------------------------------------------------------


Step D. Stop the application and check the redirection of apache to maintenancepage.html using browser.


Refrence:


Thanks :-)


What is GC , Heap Memory & Metaspace ?


What is GC (Garbage Collection)?
  • GC stands for “Garbage Collection”.
  • The JVM (Java Memory Management) has a feature of Garbage Collection,
  • The GC remove the unused objects from the program in order to make heap memory free.


The GC works in three steps format: “MARK”, “SWEEP” & “Deletion with Compacting”

  1. MARK: This step, mark the live objects in the heap memory.
  2. SWEEP: This step, removes (sweep) the dead/unreferenced objects from the heap memory.
  3. Deletion with Compacting: After removing unreferenced objects, this step compact the live/referenced objects together, which makes more memory allocation faster.

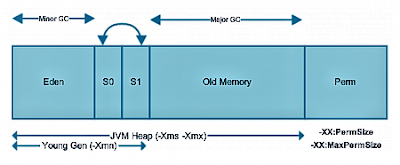
The Heap memory is divided into many generations:


1. Young Generation.
a.   Eden.
b.  Survivor (S0).
c.  Survivor (S1).
2. Old Generation (Tenured).
3. Permanent generation.


1. Young Generation.    
  • The (YG) young generations are the space where the new objects reside.
  • As young generations full, the Minor GC takes place.
  • Minor GC is always triggered when JVM is unable to allocate space for a new Object in Eden.
  • All Minor GC trigger Stop the world pauses, means stopping the application threads but mostly it is negligible.
  • Referenced objects are moved to the first survivor space (S0). Unreferenced objects are deleted when the Eden space is cleared. 

2. Old Generation (Tenured).
  • The (OG) Old Generation is the space where long survived objects reside.
  • Major GC is used to clean the Tenured space (OG). 

3. Permanent generation (PG).
  • The Permanent generation is also named as “Perm-Gen”, “Non-Heap Memory” and “Metaspace” space from JAVA 8.
  • Perm gen is used to store the class and methods objects, in the native memory which is used by the application.
  • During Full-GC the objects are cleared from Young - Old – Permanent.
  • This Perm gen is separated from main heap memory.

What is Metaspace ?

  • The metaspace is the new memory space. It has been replaced by “perm-gen” space.
  • Dynamic allocation of native memory space during class & memory leak.
  • GC calls, if the dead classes and classloaders reach the “MaxMetaspaceSize”.
  • The memory leaks can be identified by “java.lang.OutOfMemoryError “exception along with stack trace log.

  • java.lang.OutOfMemoryError: Java heap space
  • java.lang.OutOfMemoryError: GC Overhead limit exceeded
  • java.lang.OutOfMemoryError: Requested array size exceeds VM limit
  • java.lang.OutOfMemoryError: Metaspace
  • java.lang.OutOfMemoryError: request size bytes for reason. Out of swap space?
  • java.lang.OutOfMemoryError: Compressed class space
  • java.lang.OutOfMemoryError: reason stack_trace_with_native_method


Thanks :-)