Menu

Showing posts with label IBM HTTP Server. Show all posts

15 Jun 2026

๐ŸŒ WebSphere LTPA, Sticky Sessions & Session Replication Explained - Part 9

WebSphere LTPA, Sticky Sessions & Session Replication Explained | MiddlewareBox

Welcome to Part 9 of the Authentication & Identity Security Series. This article explains LTPA (Lightweight Third-Party Authentication), JSESSIONID (Java Session Identifier), Sticky Sessions, Session Replication, and session handling in WebSphere, Tomcat, JBoss and Docker environments.


Table of Contents

  • What is LTPA?
  • How WebSphere Authentication Works
  • LTPA vs JSESSIONID
  • What are Sticky Sessions?
  • Sticky Sessions vs Session Replication
  • Session Replication in WebSphere
  • Session Handling in Tomcat
  • Session Handling in JBoss
  • Docker Session Challenges
  • Common Production Issues
  • Interview Questions
  • Best Practices

Common Terms Used in This Article

AbbreviationFull Form
LTPALightweight Third-Party Authentication
JSESSIONIDJava Session Identifier
IHSIBM HTTP Server
WASWebSphere Application Server
JVMJava Virtual Machine
HAHigh Availability
DRDisaster Recovery
SSLSecure Sockets Layer

What is LTPA (Lightweight Third-Party Authentication)?

LTPA (Lightweight Third-Party Authentication) is IBM's authentication token mechanism used by WebSphere Application Server to provide authentication and Single Sign-On across applications.

User Login
    │
    ▼
WebSphere Authentication
    │
    ▼
LTPA Token Generated
    │
    ▼
Browser Stores LTPA Cookie
    │
    ▼
Future Requests Use LTPA Token
LTPA is mainly used for Authentication and Single Sign-On.

How WebSphere Authentication Works

User Browser
      │
      ▼
IBM HTTP Server (IHS)
      │
      ▼
WebSphere Application Server
      │
      ▼
LDAP / Microsoft Entra ID / AD
      │
      ▼
Authentication Success

After successful authentication, WebSphere generates an LTPA token and session information.


LTPA vs JSESSIONID

Feature LTPA JSESSIONID
Purpose Authentication Session Tracking
Used For SSO User Session
Generated After Login Session Creation
WebSphere Specific Yes No

LTPA identifies who the user is, while JSESSIONID identifies the user's application session.


What are Sticky Sessions?

Sticky Session (Session Affinity) ensures that a user continues to connect to the same application server node.

Load Balancer
      │
      ├── JVM1  ← User Always Routed Here
      │
      └── JVM2

Advantages

  • Simple configuration
  • Better performance
  • No replication overhead

Disadvantages

  • If JVM crashes, user session may be lost
  • Not ideal for HA environments

Sticky Sessions vs Session Replication

Feature Sticky Session Session Replication
Performance High Medium
Failover Support Limited Excellent
Complexity Low High
HA Support Partial Strong

Session Replication in WebSphere

Memory-to-Memory Replication

JVM1
 ↔
JVM2

Database Session Persistence

JVM1
 │
 ▼
Session Database
 │
 ▼
JVM2

If JVM1 fails, JVM2 can continue serving requests using replicated session data.


Session Handling in Apache Tomcat

Browser
   │
JSESSIONID
   │
Tomcat JVM

Tomcat supports clustering using DeltaManager and BackupManager. External session stores such as Redis are commonly used.


Session Handling in JBoss EAP

Browser
   │
JSESSIONID
   │
JBoss Cluster

JBoss commonly uses Infinispan for distributed session replication.


Docker Session Challenges

User
 │
 ▼
Docker Container
 │
 ▼
Tomcat / JBoss / Liberty

If a container restarts, in-memory sessions can be lost.

Recommended Solutions

  • JWT (JSON Web Token)
  • Redis Session Store
  • Database Session Store
  • External Session Cache

Common Production Issues

Issue Cause
Random Logout Session Timeout
SSO Failure LTPA Key Mismatch
Session Lost After Restart In-Memory Session Storage
User Routed To Wrong Node Load Balancer Affinity Issue
Session Replication Failure Cluster Misconfiguration

Interview Question

What is the difference between LTPA and JSESSIONID?

LTPA (Lightweight Third-Party Authentication) is used for authentication and Single Sign-On, whereas JSESSIONID (Java Session Identifier) is used for session tracking and maintaining user state.

Best Practices

  • Use sticky sessions only when failover is not critical.
  • Enable session replication for HA applications.
  • Synchronize LTPA keys across WebSphere cells.
  • Use Redis or database-backed sessions in containers.
  • Monitor session count and JVM memory usage.
  • Configure proper session timeout values.
  • Test failover regularly.

Key Takeaways

  • LTPA provides WebSphere authentication and SSO.
  • JSESSIONID tracks user sessions.
  • Sticky sessions improve performance.
  • Session replication improves availability.
  • Docker requires external session management for HA.

What's Next?

Part 10 – Zero Trust Security & Authentication Risks

Series: Authentication & Identity Security for Middleware, DevOps & Cloud Engineers
Author: Pradeep V
Blog: MiddlewareBox.com

11 Jul 2020

HTTP Host Header Injection (Apache and IBM HTTP SERVER- IHS)


  • To mitigate host header poisoning/attack kindly make sure.
  • Use the hostname instead of IP address in the header.
  • Can refuse a request if it doesn't have the desired or expected host header. 
  • For this, Add initial RewriteCond/RewriteRule pair to confirm the HOST requested is ABCDEF.com and error if not.
  • To restrict add below lines between <VirtualHost :443> OR  <VirtualHost :80>  


File Name : httpd-ssl.conf  OR ssl.conf
*************************************************************

LoadModule rewrite_module modules/mod_rewrite.so

<VirtualHost :443>

    ServerName ABCDEF
    RewriteEngine on
    RewriteCond %{HTTP_HOST} !^www.abcdef.com [NC]
    RewriteCond %{HTTP_HOST} !^(www.abcdef.com|abcdef.com)$ [NC]
    RewriteCond %{REQUEST_URI} !^/error [NC]
    RewriteRule ^.(.*) - [L,F]
</VirtualHost>

*************************************************************


 ## Restrict the Use of IP address  in URL to access application.

File Name : httpd-ssl.conf  OR ssl.conf
*************************************************************
<VirtualHost :443>

 ServerName ABCDEF.com
  ServerAlias www.ABCDEF.com

 #UseCanonicalName will use the hostname and port specified in the ServerName or ServerAlias

 UseCanonicalName On   


  # Restrict the Use of IP adderss in URL
  SetEnvIf Host "\d{1,3}\.\d{1,3}\.\d{1,3}\.\d{1,3}" HostHeaderIsIP=1
  RewriteEngine on
  RewriteCond %{ENV:HostHeaderIsIP} 1
  RewriteRule .* - [F]


</VirtualHost>

*************************************************************

Thanks ๐Ÿ˜Š

16 May 2017

Multiple IHS in front of WebSphere® Application Server. (On Single Install).


Step 1:  Login to IBM WAS console.

Screenshot 1:


Step 2: Click on servers > server types > Web server

Already on  one webserver on Port 443 & 80 is working.


Screenshot 2 :


Step 3: To Create a New webserver   [ NEW_webserver  ]  in mycase .

Click on New..

Screenshot 3 :


Step 4: Provide a server name  > Next .

Screenshot 4:


Step 5: Default IHS selected  > Next .


Screenshot 5:


Step 6: Provide NEW port no [ 5080 for http ] in mycase  >> Next

Screenshot 6:


Step 7: Review Summary >> Finish .

Screenshot 7:


Step 8: Click on Review.

Screenshot 8:


Step 9: Select Synchronize changes with Nodes >> Save >> OK .

Screenshot 9:


Step 10 : Now we have created the NEW_webserver , with status stopped.

Screenshot 10 :


Step 11 : Copy the working http.conf with [ NEWhttp.conf ]  in my case.

Screenshot 11:


Step 12 : Open the Newhttp.conf  and make changes.


1 >> PID File Location

2 >> Error logs location.
 3 >> Access logs location.
4 >> Servername
5 >> Listen Address From (:80 ) and ( :443 )  to  (5080) and (50443)  in mycase.
6 >> Virtual host port and ipaddress.
7 >> New Webserver Plugin file location.


Screenshot 12-1 :


Screenshot 12-1 :


Step 13 : Use Diff command to check the Diffrence between them.

Screenshot 13:


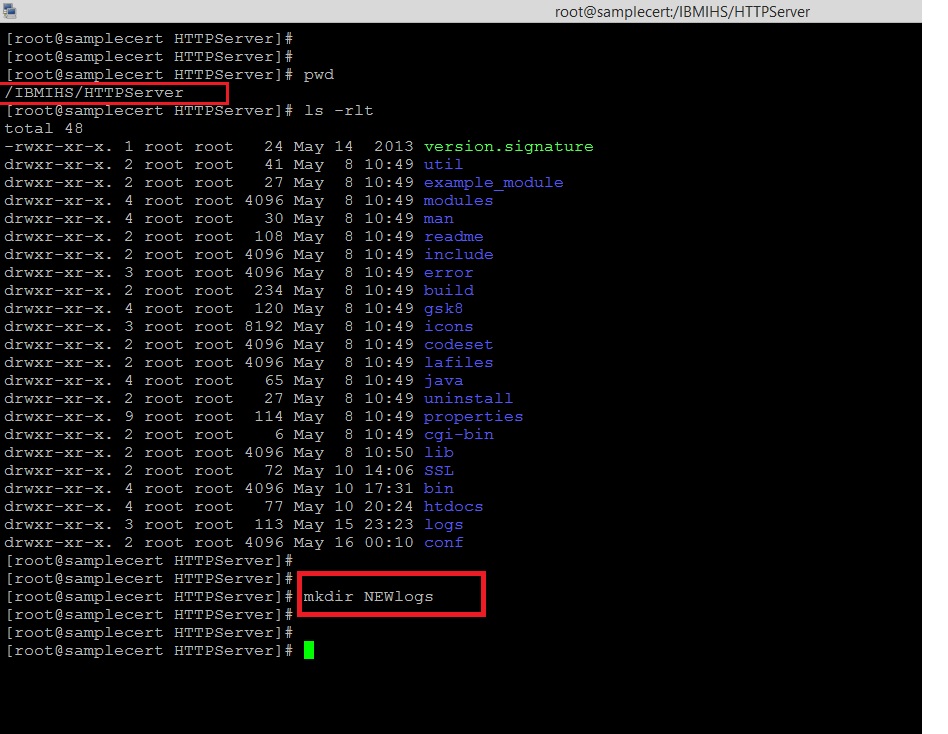
Step 14: Make a new folder of NEWlogs on IHS home .

Screenshot 14:


Step 15 : go to Webserver > NEW_webserver >> Configuration file name > Apply > Review > Synchronize changes with Nodes > Save.


Change the paramerts from console also.

Screenshot 15:


Step 16 : Changes in log file from console >>  Apply > Review > Synchronize changes with Nodes > Save.

Screenshot 16-1:


Screenshot 16-2:


Step 17 : Review Virtual Hosts from Console >>

Screenshot 17:


Step 18 : Add Virtual Hosts  from Console .

Environment > Virtual Hosts > default_host > Host Aliases

Screenshot 18-1 :


Screenshot 18-2 : Add a new Virtual Hosts Port : (5080) and  (50443)


Step 19: Add 5080 and 50443  >> >>  Apply > Review > Synchronize changes with Nodes > Save.


Screenshot 19 -1:


Screenshot 19-2:


Step 20: Review host entries.

Screenshot 20:


Step 21: Select  Enterprise Applications > calendar_war > Virtual hosts > select default_host > OK.


Screenshot 21:


Step 22 : Now Start the NEW_webserver from shell.

Screenshot 22:


Step 23: Generate and Propagate plugins from console.

Screenshot 23:


Step 24 : Manage the deployed application from console.

Screenshot 24:


 Clear the logs and  Restart the Application.


Step 25 : Check the IHS at port 5080 

Screenshot 25:


Step 26 : Check the calendar.war Application at port 5080 

Screenshot 26:


Step 27 : Check the IHS at port 50443 

Screenshot 27:


Step 28 : Check the calendar.war Application at port 50443 


Screenshot 28-1:


Screenshot 28-2:


Thanks :-)  Middleware Team  :-) !