Connector
|
Supports
Sticky Sessions
|
Adapts
to Deployment Status
|
Yes
|
Yes. Detects
deployment and undeployment of applications and dynamically decides whether
to direct client requests to a server based on whether the application is
deployed on that server.
|
|
Yes
|
No. Directs client
requests to the container as long as the container is available, regardless
of application status.
|
|
Yes
|
No. Directs client
requests to the container as long as the container is available, regardless
of application status.
|
|
Yes
|
No. Directs client
requests to the container as long as the container is available, regardless
of application status.
|
|
Yes
|
No. Directs client
requests to the container as long as the container is available, regardless
of application status.
|
Advantages:
- · Workers register themselves with httpd servers.
- · NO more workers.properties
- · Changes in cluster topology are send to httpd.
- · Deployed applications are automatically register, which can be Disable, stop & Enable from balancer HTTP console.
- · NO 404s for un-deployed applications.
- · Load balancer function automatically managed.
Software Details:
Step 1: Install Apache server on UNIX.
Use below link to install Apache
server on UNIX step by step.
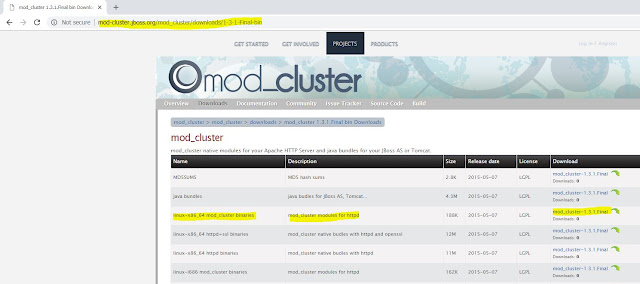
Step 2: Download “mod_cluster modules for httpd”
from below link, as per your environment.
Screenshot:
Screenshot:
Step 3: Move this mod_cluster
modules to installed Apache server modules location. “$Apache_Home/modules”.
Step 4: Add below configuration to
httpd.conf file at “$Apache_Home/conf”.
NOTE: Disable
mod_proxy_balancer module.
# mod_proxy_balancer should be
disabled while using mod_cluster.
***************************************************************
LoadModule proxy_module modules/mod_proxy.so
LoadModule proxy_ajp_module modules/mod_proxy_ajp.so
LoadModule proxy_cluster_module modules/mod_proxy_cluster.so
LoadModule cluster_slotmem_module modules/mod_cluster_slotmem.so
LoadModule manager_module modules/mod_manager.so
LoadModule advertise_module modules/mod_advertise.so
MemManagerFile /Apache/HTTPDWEB2.4/MemManagerFile
<IfModule manager_module>
Listen 10.142.0.2:9111
ManagerBalancerName
mycluster-1
ManagerBalancerName
mycluster-2
<VirtualHost 10.142.0.2:9111>
<Directory />
## AllowOverride None
Require all granted
</Directory>
ServerAdvertise off
EnableMCPMReceive
KeepAliveTimeout 60
<Location /mod_cluster_manager>
SetHandler
mod_cluster-manager
Require all granted
</Location>
</VirtualHost>
</IfModule>
AllowDisplay On
***************************************************************
Where,
MemManagerFile: That is the
base name for the names mod_manager will use to store configuration, generate
keys for shared memory or lock files. That must be an absolute path name; the
directories will created if needed. It is highly recommended that those files
are placed on a local drive and not an NFS share.
Default: $Apache_Home/logs/.
ServerAdvertise On: Use the
advertise mechanism to tell the JBoss AS to whom it should send the cluster
information.
ServerAdvertise On http://hostname:port: Tell the hostname and port to
use. Only needed if the VirtualHost is not defined correctly, if the
VirtualHost is a Name-based Virtual Host [http:// httpd.apache.org/docs/2.2/vhosts/name-based.html]
or when VirtualHost is not used.
ServerAdvertise Off: Don't use the advertise mechanism.
EnableMCPMReceive - Allow the VirtualHost to receive the MCPM from
the nodes. You need one EnableMCPMReceive in your httpd configuration to allow
mod_cluster to work, put it in the VirtualHost where you configure advertise.
SetHandler mod_cluster-manager:
That is the handler to display the node mod_cluster sees from the cluster. It
displays the information about the nodes like INFO and additionally counts the
number of active sessions.
NOTE:
On httpd 2.2
#########
Order allow,deny
Allow from all
#########
And On httpd
2.4 we use,
#########
Require all granted
#########
We have done with mod_cluster configuration on Apache Server.
Screenshot:
Step 5: For performing mod_cluster method, we need to use
standalone-ha.xml or standalone-full-ha.xml profile, Since this ha &
full-ha has a mod_cluster subsystem configuration.
We will use ha profile.
Step 6: Add Jboss Server name on “standalone-ha.xml”.
**********************************************
<?xml version='1.0' encoding='UTF-8'?>
<server name="jboss-eap-6.4-1" xmlns="urn:jboss:domain:1.7">
<extensions>
**********************************************
Screenshot:
Step 7: Add Proxy-list and Balancer
name to “standalone-ha.xml” mod cluster subsystem.
***************************
<subsystem
xmlns="urn:jboss:domain:modcluster:1.2">
<mod-cluster-config proxy-list="10.142.0.2:9111" advertise-socket="modcluster"
connector="ajp"
balancer="mycluster-1" >
<dynamic-load-provider>
<load-metric type="busyness"/>
</dynamic-load-provider>
</mod-cluster-config>
</subsystem>
***************************
Step 8: Add Node name to “standalone-ha.xml” web subsystem.
***************************
<subsystem
xmlns="urn:jboss:domain:web:2.2"
default-virtual-server="default-host" native="false" instance-id="jboss-eap-Node-1"
>
<connector
name="http" protocol="HTTP/1.1" scheme="http"
socket-binding="http"/>
<connector
name="ajp" protocol="AJP/1.3" scheme="http"
socket-binding="ajp"/>
<virtual-server
name="default-host" enable-welcome-root="true">
<alias
name="localhost"/>
<alias
name="example.com"/>
</virtual-server>
</subsystem>
***************************
Screenshot:
./standalone.sh -c standalone-ha.xml
-b 10.142.0.2 -bmanagement 10.142.0.2
Step 10: Now, perform same configuration changes using different server name, balancer name & instance-id
on “JBoss instance-2”.
NOTE: use port offset for socket-binding on “standalone-ha.xml”.
**********************************
<socket-binding-group
name="standard-sockets" default-interface="public"
port-offset="${jboss.socket.binding.port-offset:10}">
**********************************
Step 11: Start the “JBoss
instance-2” from “$JBOSS_HOME-2/bin”, using below script.
./standalone.sh -c standalone-ha.xml
-b 10.142.0.2 -bmanagement 10.142.0.2
Screenshot:
Step 12: Check through browser, using http://ip:PORT/mod_cluster_manager
Step 13: check the applications.
Reference links:
- http://docs.jboss.org/mod_cluster/1.3.0/pdf/Mod_cluster-UserGuide.pdf
- https://docs.jboss.org/author/display/AS71/Setting+multiple+mod_cluster+load+balancers+in+clustering+environment
- https://docs.jboss.org/mod_cluster/1.2.0/html/
- http://mod-cluster.jboss.org/mod_cluster/downloads/1-3-1-Final-bin
Thanks :-)


No comments:
Post a Comment